Welcome to our first article on how to maximise the impact of MyHealth1st in your practice or clinic – where we’ll cover how proper implementation of your book now button on your website can really make all the difference.
The Book Now Button
To kick things off, let’s start by explaining what the MyHealth1st Book Now button is:
The MyHealth1st Book Now button is the quickest way for people to book online appointments from your practice's website – by loading MyHealth1st’s full booking functionality from the comfort of your own website.
This button can be placed anywhere within your website, and when clicked on by a patient it will load the Booking Form, which displays the published appointments of all your active practitioners with the corresponding treatment types.
People can then select their preferred practitioner, treatment types and preferred date and appointment time and complete their booking – easy!
In this article we will touch on where to place your book now button, talk you through how to customise and install it.
Where to place the Book Now Button
We suggest placing the Book Now button on as many places of your website as you can to ensure all potential clients coming to your site find booking with you quick and easy.
Below you’ll find a list of example places you should place your button, however don’t be restricted by this list if you think there is somewhere else on your website that it could work.

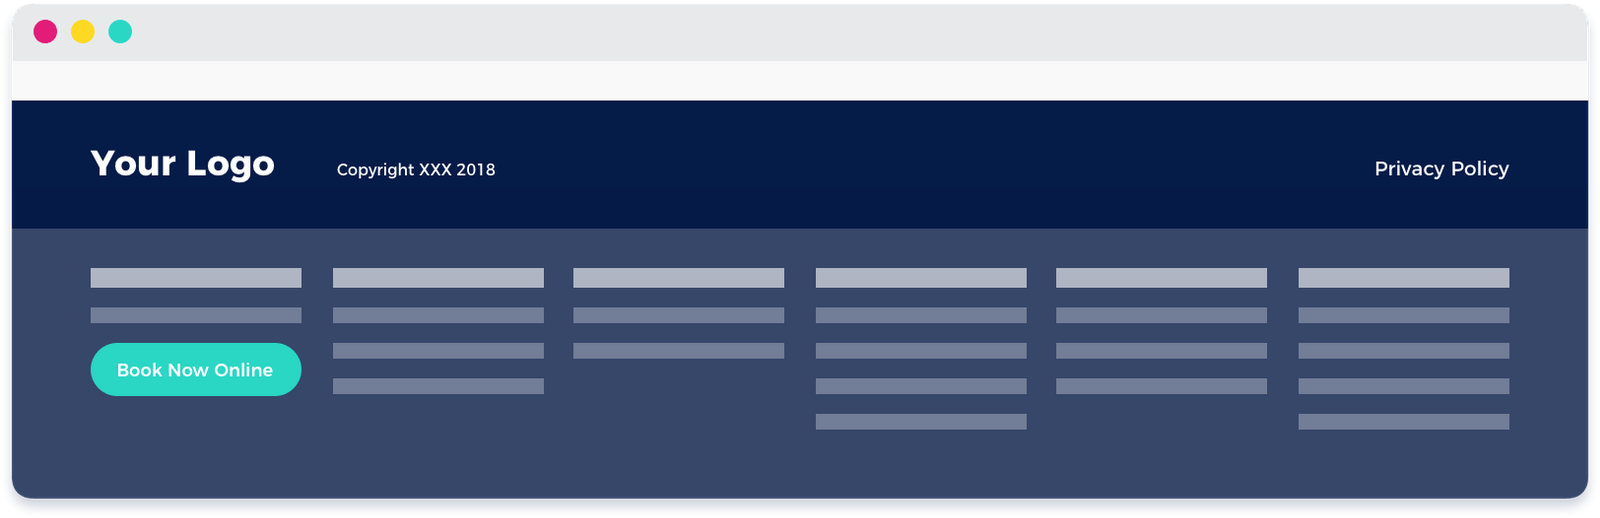
Header of Your Website
By placing the Book Now button within the header of your website, it is likely to be one of the first things visitors to your website see. The header is also generally consistent across all pages of your website, ensuring no matter which page a potential client is on, they will be able to find your button.
Footer of Your Website
When a user has scrolled all the content on a web page, they will find themselves at the footer of your site.
This is often used by designers to incorporate a site-map style menu for easy navigation for the user, and including a Book Now button here will prove valuable in increasing bookings.
Like the header, the footer is also generally consistent across all pages of your website, ensuring no matter which page you’re on, your button is always visible.
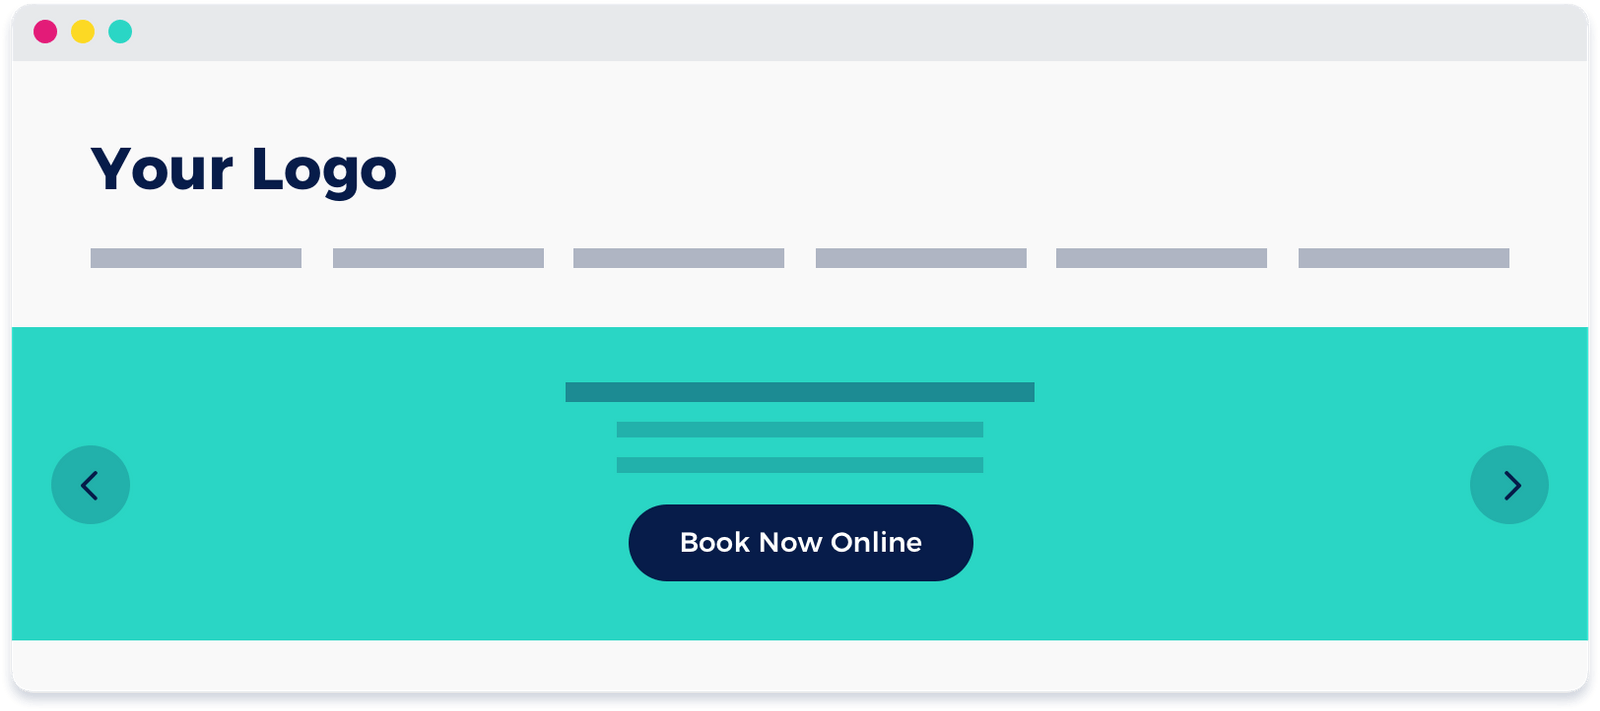
Home Page Slider
If your website has a slider on the home page, this is one of the most valuable pieces of website real estate – and placing a Book Now button here will see significant results.
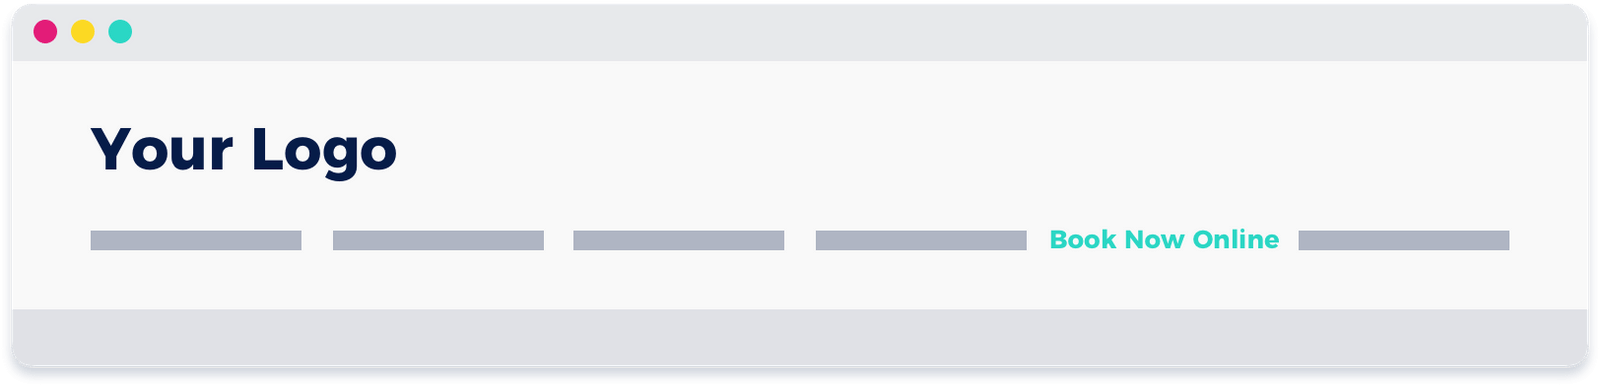
Website Navigation
Similar to placing your Book Now Button in the website header, placing a Book Now Button within your Navigation Menu offers patients another way of booking with you.
As many web users will look straight to the menu when they land on a webpage, this is another vital location for your Book Now button. Depending on your website design, it may be appropriate to highlight this navigation item in a contrasting colour so it is more prominent.
Specific Treatment Type Pages
Specific pages dedicated to treatment types or special offers are another ideal place to utilise your Book Now Button and by customising the text on your button, can provide a powerfully relevant Call to Action for website visitors.
Customising and Installing the Book Now Button
The MyHealth1st Book Now Button comprises three main parts to its code, including the Style (how it looks), the Script (the part that connects your website to MyHealth1st) and the HTML (what the visitor clicks on).
You’ll find below sample code for implementing the Book Now Button onto your website.
To implement it, all you need to do is :
- Locate your MyHealth1st profile page URL
- Modify the text description: Practice Name, Modality and Location. (Yes, it's SEO friendly!)
- Practice ID (supplied in your Welcome to MyHealth1st Email, or from your MyHealth1st Account Manager) and insert it into the code below, then it’s ready to copy straight into each location you wish the button to appear.
Check and copy the code below:
MYHEALTH1ST BOOKING WIDET CODE
It’s important to ensure your book now button stands out on your website and is as easy as possible for your customers to find – ensuring web visitors turn into appointments.
If you’re handing over the install of your button to your IT staff or Web Developer, they should work to integrate the Book Now button into your site as seamlessly as possible from a design (look and feel) perspective.
If you’re installing the button yourself (perhaps you have a member of staff who is CSS & HTML savvy), we suggest utilising all of the sample code provided above with the instructions below, adjusting each line to see what works best for your site.
When tweaking the appearance of the book now button, we suggest considering contrasting colours to your website so it really pops, and also including the word “Online” in the text – otherwise some patients may think it’s just an instruction rather than a button.
The HTML text in the button
We have included a calendar icon into the Book Now Button which we advise you to leave in the button at all times as it’s a recognisable visual cue for web users. If you wish to customise the text to better suit specific locations on your website, you can modify the text section to suit your needs. We suggest using text in this space similar to the following, however you should adjust this to best suit the context of the button and how much space you have.
• Book an Appointment Online Now
• Book an Appointment Now
• Book Now
• Book an Eye Test Now
If you don’t have a member of staff who is across HTML and CSS and this all seems to hard – don’t hesitate to get in touch with your MyHealth1st Account Manager or email marketing@1stgrp.com and we’ll be happy to work with you to ensure your Book Now button is the best it can be.
Note for Squarespace and WIX websites
Squarespace:
The Book Now Button will not work reliably on Squarespace Websites. We suggest using the iFrame implementation on Squarespace websites, with Squarespace buttons across the site linking to the page where the iFrame has been loaded.
WIX:
Both the Book Now Button, and iFrame implementation will not work on WIX websites, due to WIX’s own platform limitations.
As such, we suggest using the below URL with your practice ID inserted as the link behind WIX buttons on your site: https://MyHealth1st.com.au/availability/getPracticeAvailability?id= PracticeIDHere
The Booking Form iFrame
An alternative to the Book Now Button is to embed the whole form into an iFrame on your website.
This is great for pages on your site where you wish to show all practitioners and appointments available to the user straight away.
Where to Place It
When a patient is looking to make an appointment, force of habit will encourage the user to navigate to the Contact Us page of your website.
We suggest utilising this Booking Form instead of static “Contact Us” forms to encourage users to make appointments with you.
As a high traffic, high engagement page, this is a great place to implement the Booking Form on your website.

How to Place It
The MyHealth1st Booking Form code is very simple, and doesn’t contain any scripts or style tags (unlike the Book Now Button).
You’ll find below sample code for implementing the Booking Form onto your website. To implement it, all you need to do is locate your Practice ID (supplied in your Welcome to MyHealth1st Email, or from your MyHealth1st Account Manager) and insert it into this code . It’s then ready to copy straight into each location where you’d like it to appear.